Using Google Tag Manager and Google Analytics to track events on your website is generally a great way to measure and learn about how your SEO and Digital Marketing efforts are paying off, and how real-life visitors are experiencing your website.
Unfortunately, setting up event tracking with GA and GTM (Google Analytics & Google Tag Manager) can be a bit complicated because of how powerful those platforms are and all the different customization options that are available.
Fortunately, after some research online, a little trial and error, and stumbling on some informative blog articles, I was able to get a handle on how to track form submissions in Google Analytics with Elementor Pro forms using Google Tag Manager.
Now this article got a little long, so you might need to take a breather half way through 🙂
Essentially, this article will show how to add a piece of code to your website through Elementor’s Custom Code feature, and how to set up a Trigger and Event in Google Tag Manager, to catch form submissions and send relevant event data to Google Analytics.
In a future article, we’re going to look at setting up custom reports in Google Analytics G4 so we can make better sense out of our form submissions data we receive.
But one thing at a time.
How To Trigger Form Submission Events In Elementor Forms
On my website, I have a bunch of forms that I’d like to track in Google Analytics G4 when they get submitted and I’d like to identify which form was used and from what page.
After a little Googling, I discovered that there are a few different ways you can trigger and track form submissions using Elementor forms and Google Tag Manager.
One of the ways I found uses Element Visibility Triggers in Google Tag Manager and relies on the automatic confirmation message that appears when you submit a form in Elementor to tell GTM to register the event.

Another way involves redirecting successful form submissions to a thank you page and using the URL of the thank you page to trigger an event in Google Tag Manager.
Now, being the stubborn guy that I am, I decided on a third option (which I found through this article, aptly named How To Track Elementor Form Submissions in Google Analytics Events using JQuery), which uses a piece of jQuery code (similar to JavaScript) that you place on every page of your site and that “listens” for form submissions and triggers events that GTM can pick up on.
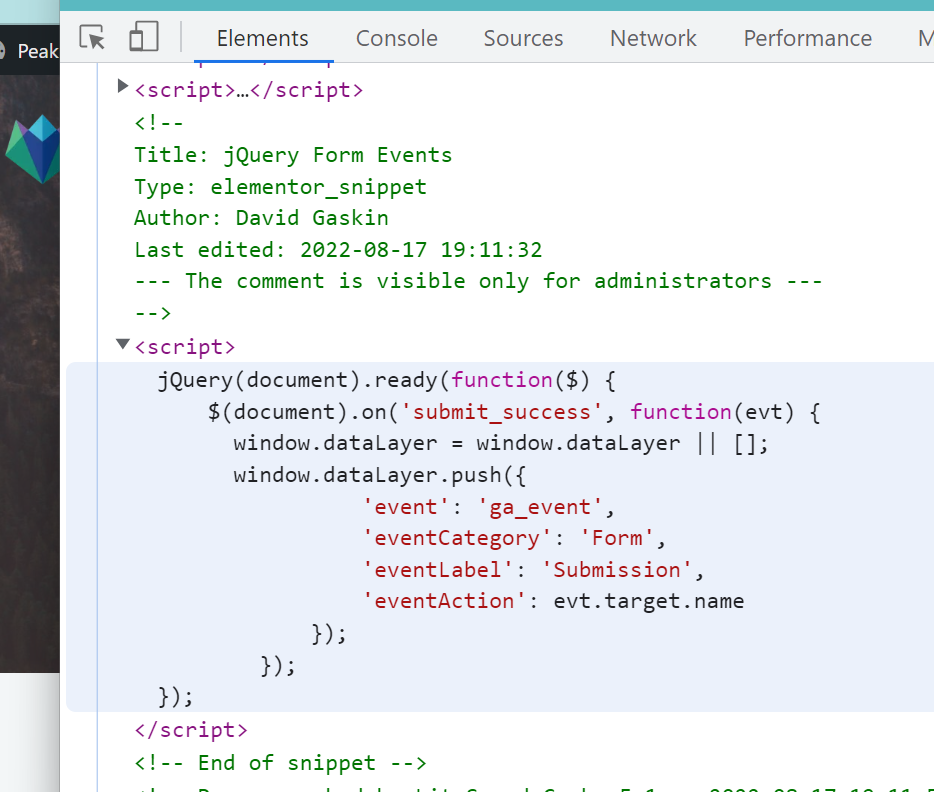
Here’s what that code looks like:
<script>
jQuery(document).ready(function($) {
    $(document).on('submit_success', function(evt) {
      window.dataLayer = window.dataLayer || [];
      window.dataLayer.push({
		'event': 'ga_event',
		'eventCategory': 'Form',
		'eventLabel': 'Submission',
		'eventAction': evt.target.name
        });
    });
});
</script>
Credit to the article: Bulletproof Elementor form tracking with GTM for publishing this code snippet.
What this code is essentially saying is, once the web page loads, listen for when a form is submitted. When submitted, tell the browser about this event and pass along some information about the form.
In this case, the data we’re passing along are ‘event’, ‘eventCategory’, ‘eventLabel’ and ‘eventAction’. This data will be picked up by Google Tag Manager and sent to Google Analytics later on.
Why did I choose this option and not the others?
- I wanted to challenge myself
- I like the elegance and simplicity of this code and the fact that it listens for ANY form submission. This “catch-all” approach will work regardless of whether you send people to a thank you page or make visible an element on the page
- I’m confident that form submission events (native to browsers), paired with jQuery, would be well-supported in client browsers new and old and so this method is pretty robust (feel feel to challenge me on this in the comments!)
Adding Custom Code To Your Site with Elementor
If you’ve never used the Custom Code feature in Elementor, well, you’re missing out.
With it, you can easily add custom code snippets to the different parts of your site (<head>, <body>) easily through the admin dashboard as well as setting the priority for when the code will run.
To insert custom code on your site with Elementor:

- Log into the backend of your site
- In the left menu, select Elementor > Custom Code
- Select ‘Add New’
From there, you can paste in the code above, name your piece of code (something descriptive) and specify the location of the code (where on the page it will load).
For our purposes, we want to load our jQuery script at the bottom of the page, after everything else has loaded.
For priority, you can leave it at one (1 means high priority, 10 means low priority).

When you click ‘Publish’, you’ll be asked where you want this code to load. Unless you only want it to load on certain pages, you should select ‘Entire Site’ so that this code snippet will be included on every page.

Verify that the code is loading
Before we move on, let’s verify that the code snippet is showing up on the page as expected.
To verify that the code is appearing in your page, navigate to a page of your website and hit F12 on your keyboard (or right-click and choose ‘Inspect’ from the context menu).
This will bring up the Chrome Developer Tools window in your browser.
Now, make sure you’re on the Elements tab and scroll down to the bottom of all the code (because we told Elementor to insert the snippet at the end of the <body> tag).
Et voila! Now we’re sure that this code is where it should be (if you don’t see the code, try refreshing your browser cache or Regenerate Files & CSS in Elementor > Tools).
Next, it’s time to move on to Google Tag Manager and set up a trigger to capture the event that this code snippet triggers.
Setting up a Trigger in Google Tag Manager
We’ve placed a piece of code at the end of the <body> tag that appears on every page of our site. This code sends an event – along with data about the event – to the browser.
We now want to set up a trigger in Google Tag Manager to catch this event and do something with it. That “something” is to send an event to Google Analytics, which we’ll do later on in this post.
Important: Before you can set up a trigger in GTM, you’ll need to install Google Tag Manager on your site and create a container for the website in question.
Once you’ve set up a container for your site in Google Tag Manager, navigate to the left side menu and select ‘Triggers’. In the subsequent window, select ‘New’ on the top-right side.
In the window that pops up, click in the area where it says ‘Trigger Configuration’ and scroll down to ‘Custom Event’:

In the ‘Event name’ field, copy and paste the ‘event’ value from the custom code snippet we touched on above. In our example, that was ‘ga_event’.
Important: the name of the event must match the code we placed on our website exactly for the trigger to recognize it.
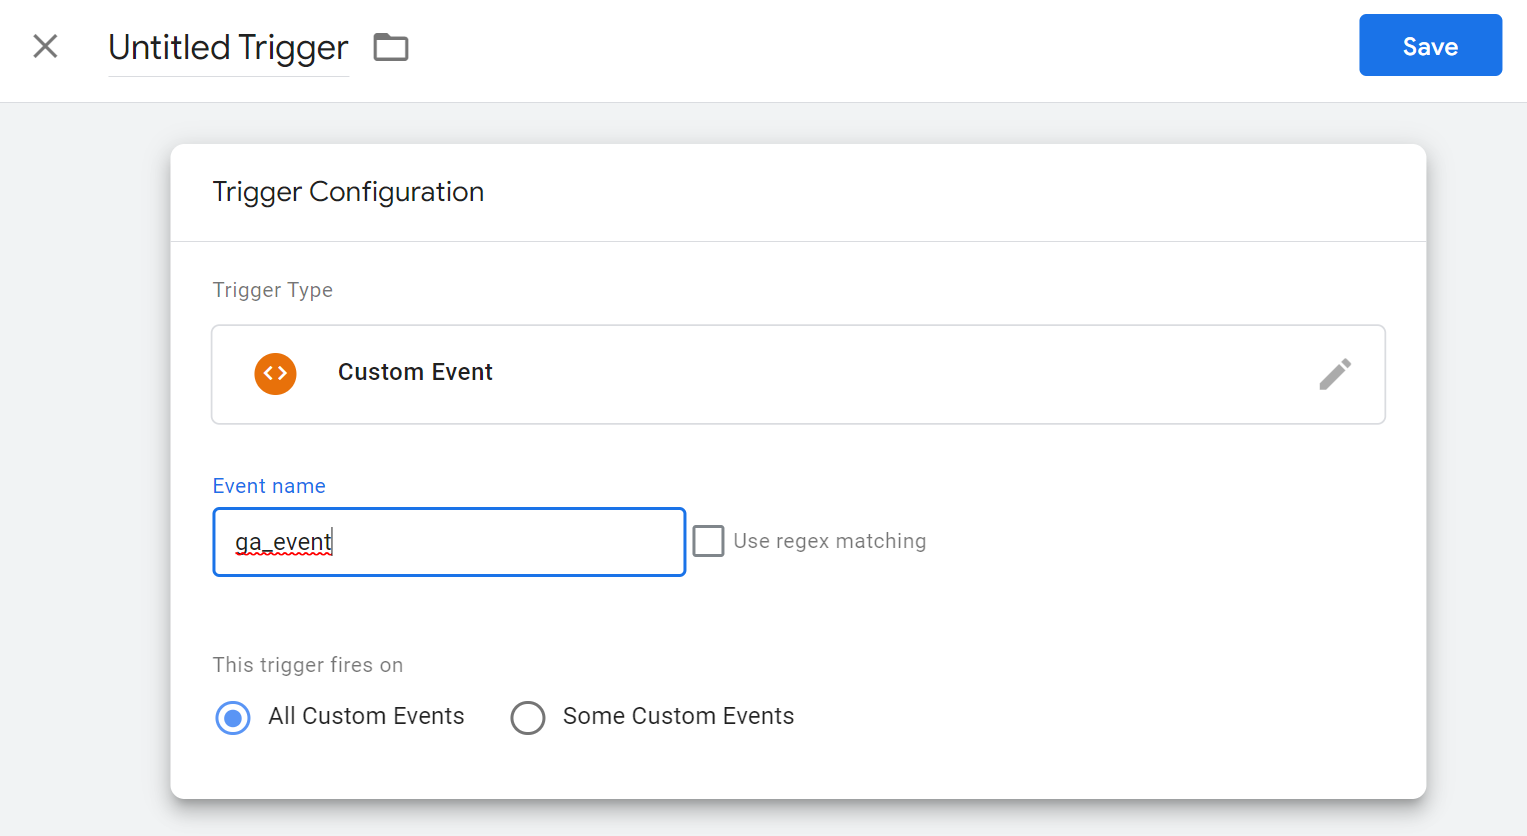
Leave everything else as is and click ‘Save’. You’ll be prompted to name your trigger, so name it something descriptive like Form Submission Trigger.
Create an Event Tag in Google Tag Manager
Now that we’ve set up a Trigger in GTM that is “triggered” when our custom code event is sent in the browser, we’ll need to create a Tag in Google Tag Manager to collect this data and send it to Google Analytics G4.
Before we can do that, we’ll need to ensure we have configured a Tag for Google Analytics GA4, which essentially connects GTM to your GA4 account (you might already have this set up if you’ve been using GTM and GA4 together for a while).
Configure GA4 Property in Google Tag Manager
First, locate your Measurement ID in Google Analytics G4.
In your Google Tag Manager container, on the left-side menu, select ‘Tags’ then ‘New’ in the top-right.
Locate and select ‘Google Analytics: GA4 Configuration’.
Paste in your Measurement ID and select ‘Send a page view event when this configuration loads’.
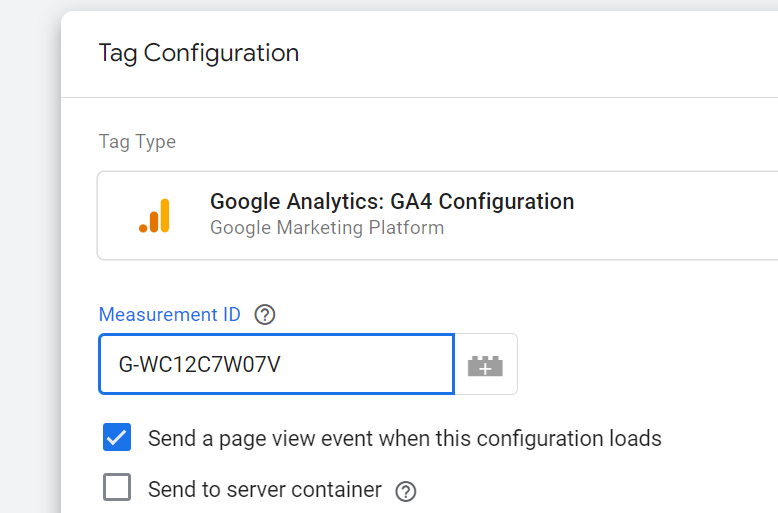
Finally, set the trigger for this tag to All Pages:

Save and give your tag a name like Google Analytics G4.
Create Google Analytics: G4 Event Tag
Next, we’re going to create one more tag to send our event data to Google Analytics (see I told you this stuff was complicated!)
Again, from the GTM main window, select ‘Tags’ on the left-side and select ‘New’.
Click inside the ‘Tag Configuration’ window and choose ‘Google Analytics: G4 Event’:

In the ‘Configuration Tag’ field, select the Tag you just created or input your G4 measurement tag manually:

Next, give your event a name – this will be the name you see in your Google Analytics G4 dashboard later on:

Next, we want to link this Event Tag to the trigger we created before.
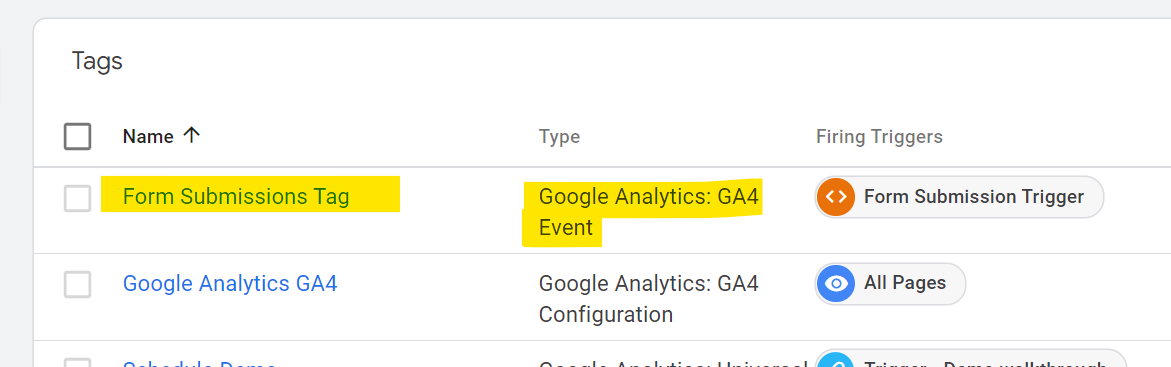
Scroll down and click in the Trigger window and select the Form Submission Trigger we set up earlier:
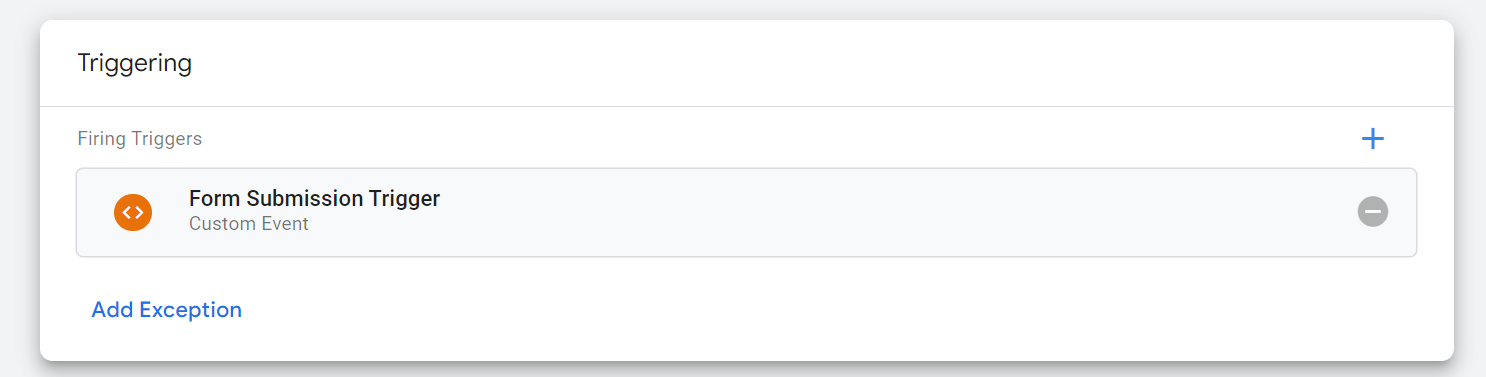
Click ‘Save’ and name your Tag. I named mine Form Submission Tag to keep things simple.
Testing our Tags in Google Tag Manager and Google Analytics
Up to now, we’ve added a snippet of code to every page of our website with Elementor’s Custom Code feature.
We’ve also created a Trigger in GTM that connects to this event using the event name ‘ga_event’, and set up a Tag in GTM that connects to this trigger and sends this event data to Google Analytics G4.
Let’s test out this functionality in our browser to see if it’s working before we go any further.
Previewing events in Google Tag Manager
Now, the nice thing about Google Tag Manager is that it has a helpful preview and debugging console that allows us to trigger our event in real-time, and view the information that the event is sending.
Let’s do that now.
In your Google Tag Manager container (the one we’ve been working in), in the top-right, select Preview:

A new tab will open where you’ll enter the URL of your website (if it’s not there already).
Once you click ‘Connect’ it will open your website in a new tab in the browser. This tab is connected to Google Tag Manager and anything you do will be tracked by the GTM debugging tool.
Going back to the previous browser tag (labeled Tag Assistant), click ‘Continue’ to close the popup and view the debug information.

Here we’ll see all the events that have happened so far on the page the GTM knows about:

We’ll also see which tags have fired so far:
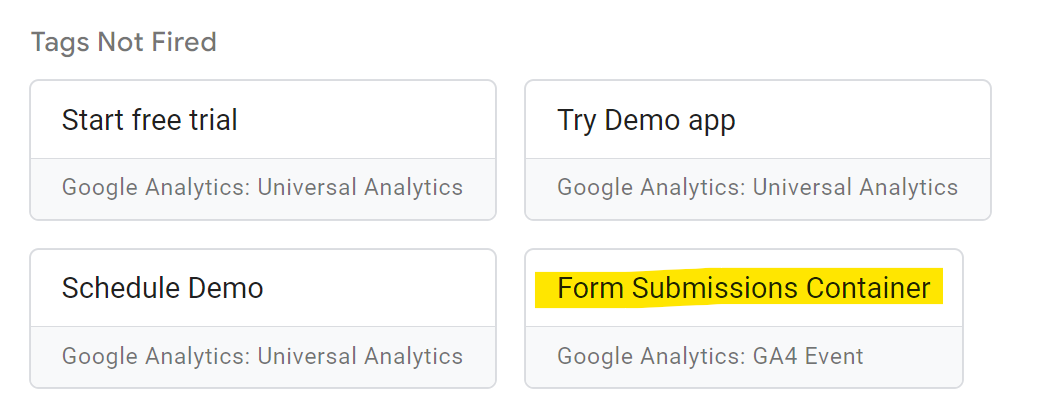
If I scroll down further, I can see other tags, including the one I set up, Form Submission Container, that have not fired yet:
Testing our forms in Preview mode
Let’s go back to our website tab in the browser and try submitting a form. This should cause our Form Submissions Container to fire.
Once I’ve submitted my form, I’ll notice my event (the one I declared in my Elementor Code Snippet), in the GTM events list on the left:

Clicking on it, I can see that submitting our form caused our Tag to fire:

Viewing our event in Google Analytics
Let’s see if this event was sent to Google Analytics G4.
Open up your Google Analytics account and go to your G4 property.
Click Reports > Realtime, and scroll down to the Events section:

And there I can see my event!
If I click on form_submission, I can see more information about this event:
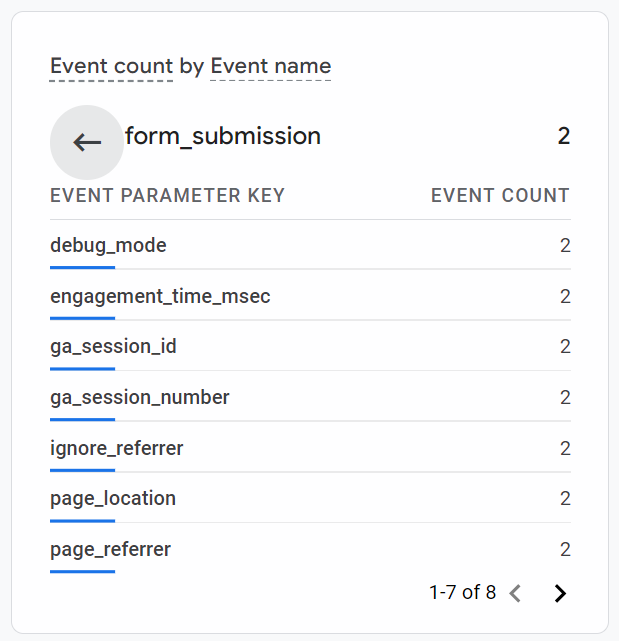
But a lot of this information is generic, automatically sent with our Google Analytics G4 Event Tag, and not really customized to my needs.
I’d like to know the name of the form and maybe the path of the page where the form was sent.
With this information, I can later set up a custom report to gain a better sense of which forms are being used on my site.
So how can we set up our own event parameters to attach some more useful information to this event?
Customizing event parameters in Google Tag Manager
I’d like to know more specifically which form was submitted so that I can better keep track of form submissions on my site.
To do that, I’m going to create a custom event parameter that I’ll add to my Custom Event Tag in Google Tag Manager.
Thankfully, I found this article: Generic Event tracking in Google Tag Manager which gave me some clues on how to do this.
But the first step is to make sure my form has a descriptive name.
How to name your Elementor Forms
In order for me to be able to identify which form that was submitted, I’m going to have to give each of them a name.
Back on my site, I’m going to find the form I want to name.
In Elementor, you can easily name your forms by navigating to your form and selecting ‘Edit Form’:

In the proceeding edit window, you’ll see a field called Form Name. I’m going to name my form “Free SEO Audit” because that’s what the form is for:

Update the form in Elementor Pro and head back over to Google Tag Manager.
Creating Variables in Google Tag Manager
To create a custom variable that we’ll attach to our form submission event, we’ll navigate to the ‘Variables’ section in the container and set up a new custom variable.

Scroll down and find ‘User Defined Variables’ and click ‘New’:

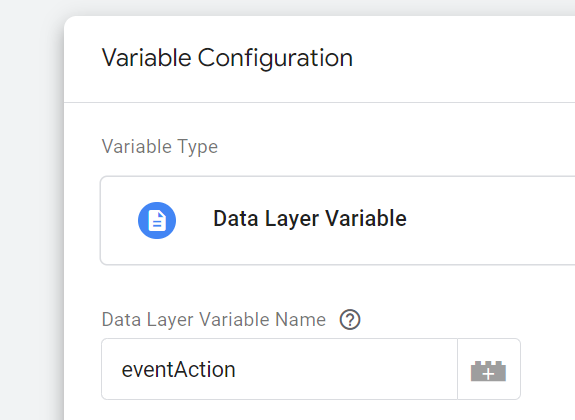
Click inside the ‘Variable Configuration‘ window and locate ‘Data Layer Variable‘.
This will help us reach into that code snippet that was set up on our web page earlier and pull out the data we want. We’ll include this variable information in the event data we send to Google Analytics.
In the field ‘Data Layer Variable Name‘, we want to put in the label that corresponds to the name of our form. If we look at our code snippet again from before, we can see that the label ‘eventAction’ is set to receive the name of the form:
'eventAction': evt.target.name
In the example above, ‘evt’ is the “event”, in this case, the form being submitted. ‘evt.target.name’ essentially means, get the name of the target that this event was fired on. When the event is triggered in real time, that line of code will be replaced with the name of the form.
So we’ll use that label as our the ‘data layer variable name’ we want to target:
Click ‘Save’ and give your variable a name. I opted to name my variable DLV – eventAction after being inspired by this post about using the Data Layer to Track Forms with Google Tag Manager:

Adding Custom Variables to our Event Tag
Now that we’ve set up a custom variable in GTM, we want to add it to the Event Tag we created earlier.
Click back to the ‘Tags’ menu and find the ‘Google Analytics G4 Event’ Tag:
Click on the pencil in the top right corner to edit the tag.
Expand the ‘Event Parameters’ section and click ‘Add Row’.
Now, in the ‘parameter name’ field, give your event parameter a name. In my case, I will name it “form_name”.
In the ‘value’ field, I’ll locate my custom variable by clicking on the icon that looks like a Lego block and finding the custom variable I created in the previous step:

Click on the variable you set up and you’ll see that is now populated the the Value field:

While I’m at it, I’ll also add an Event Parameter for the path of the webpage. This will allow me to see the URL path that the form was submitted on.
I’ll add another row and name my parameter ‘page_path’.
Then I’ll click on the Lego block icon and find the built-in ‘Page Path’ variable:

Once I select it, it will show up as the value for this parameter.
I now have 2 Event Parameters configured for this Event Tag, form_name and page_path:

Testing Custom Variables in Google Tag Manager
Before we hang up our boots for the day, let’s test our new variables in Google Tag Manager and confirm that they are appearing in Google Analytics.
Go back to Tag Manager and ‘Preview’ again. Connect to your site and trigger the form once again.
Now click back to the ‘Tag Assistant’ tab and look for that event in the ‘Summary’ list. I can see that the ‘ga_event’ was triggered and that my Form Submissions Tag was fired:

Interestingly, if we scroll up a little, we’ll see a section labeled ‘API Call’ which shows us the data that is being sent from our form:
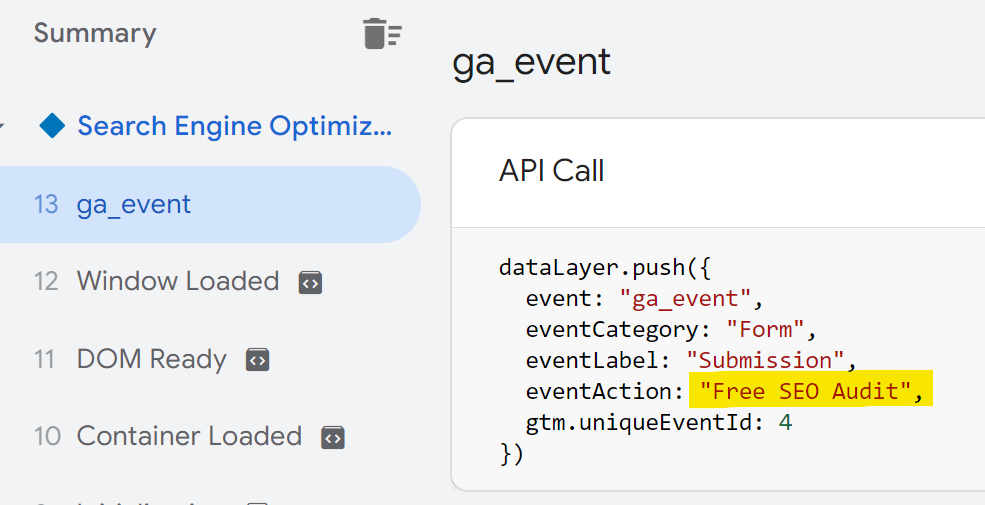
This is the same information that we set up in our code snippet earlier.
We can also see that the value of ‘eventAction’ has been replaced with the name of the form !
Viewing Our Event Tag Variables in Google Analytics G4
We now know that our Event Tag is firing as intended, so let’s go back to Google Analytics and see if we can find our custom variables.
I’ll go back to my G4 property, select Reports > Realtime and scroll down to the ‘Events’ section.
Once again, I can see my event in the list:

Now if I click on this event, I’ll be able to see all the variables that were sent along with it:

Caption: Both of the custom variables I created on the Event Tag have been included with this event.
Clicking on the ‘form_name’ variable, I’m able to see the name of the form that was submitted:

Publishing your changes in Google Tag Manager
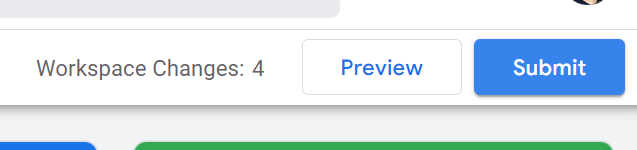
Finally, after setting everything up and testing it, it’s time to publish our changes in Google Tag Manager.
Back on the GTM main screen, click ‘Submit’:
You’ll be asked to give your version a name and to add a detailed description. When you’re done click Publish.

Your changes will be updated via your GTM ID and you’ll be shown a summary of what you did including the changes you made:
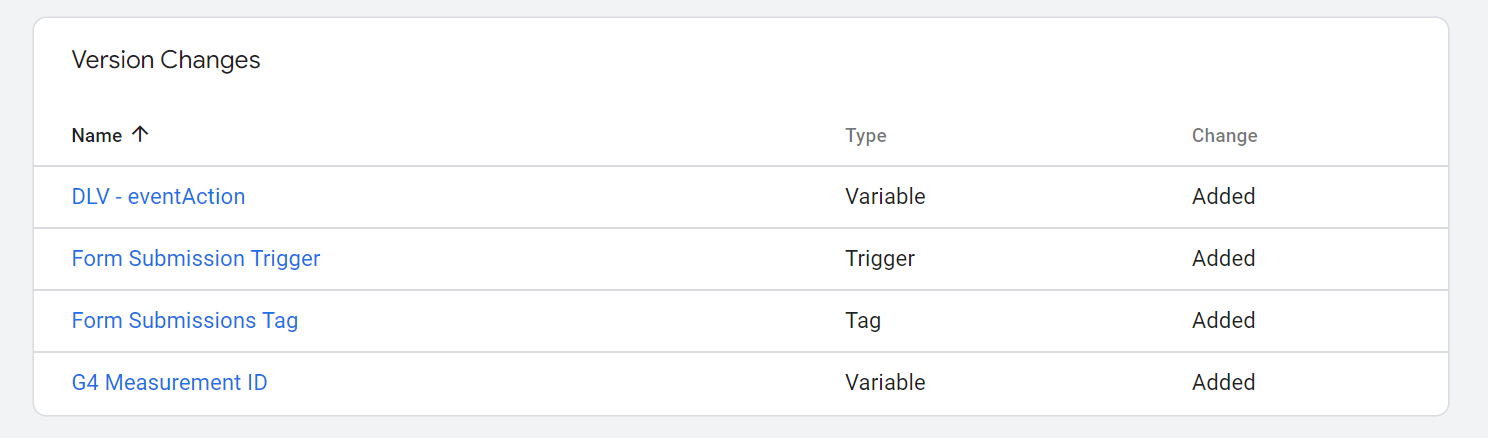
Caption: Here we see our Tag, Trigger, and Variables we set up (the last one was not included in this tutorial and is just a ‘constant’ variable with my G4 measurement ID to make referencing it easier later on.

Conclusion
So that was a lot!
As you can tell, Google Tag Manager has a lot to it, and setting things up the way you want to can take a little bit of work to get it right but once you start to get the hang of it, your workflow can get a little faster and it’ll will become a little easier.
To recap what we did:
- We added a snippet of code to every page of our site with Elementor Custom Code
- This code snippet includes an event label (‘ga_event’) and a label that gets the name of the form (‘evt.target.name’)
- In Google Tag Manager, we set up a Trigger that responds to the event sent by the code snippet by looking out for ‘ga_event’
- We also created an Event Tag and added custom event parameters to it including the name of the form and the page path
- We linked to GTM Trigger to the Event tag so that when the trigger is, well, triggered, it will send the event tag information to Google Analytics
Working with Google Tag Manager can seem complicated but it’s a powerful tool and allows you to track just about anything you can imagine on your website.
In a future post, we’re going to troubleshoot how to set up custom reports in Google Analytics G4 for our form events so we can more easily visualize this data.
Now it’s your turn.
How are you going to use event tracking on your website to track website events?
Thanks for reading!